

This is the comprehensive guide to preparing manuscripts using the AASTeX v6.3.1 classfile (aastex631.cls). Authors using the earlier AASTeX classfiles should use their guides as some of the functionality is different or may not work in v6.3.1. A list of the major differences between the versions of AASTeX is available on the revision history page.
The v6.3.1 macros distribution package includes a new sample LaTeX template. The sample pdf provides a quick overview of some of the features. This guide is more extensive.
The American Astronomical Society (AAS) has developed a markup package to assist authors in preparing manuscripts intended for submission to its journals.
The most important aspect of the AASTeX package is that it defines the set of commands, or markup, that can be used to identify the structural elements of manuscripts. When articles are marked up using this set of standard commands, they may then be submitted electronically to the editorial office which aids both the peer review ingest and production processing while producing high quality output in a variety of styles.
This guide contains basic instructions for creating manuscripts using the AASTeX v6.3.1 markup package. Authors are expected to be familiar with the editorial requirements of the journals so that they can make appropriate submissions; they should also have a basic knowledge of LaTeX-for instance, knowing how to set up equations using LaTeX commands.
This section describes the commands in the AASTeX v6.3.1 package that an author might enter in a manuscript that is being prepared for electronic submission. The commands will be described in roughly the same order as they would appear in a manuscript. The reader will also find it helpful to examine the example files that are distributed with the package.
In LaTeX manuscripts, the preamble is that portion of the file before the \begin{document} command.
The first piece of markup in the manuscript declares the overall style of the document. Any commands that appear before this markup will be ignored.
\documentclass{aastex631}
This specifies the document class as aastex with the default style. The manuscript copy produced by this style is a tight typeset, single column format. Other styles are available. These styles, along with other publishing options, are discussed in greater detail in Section 3.
AASTeX allows authors to define their own commands with LaTeX’s \newcommand. (Authors should not use the plain TeX \def command in AAS journal submissions.) Authors’ \newcommand definitions must be placed in the document preamble.
In general, author-defined commands that are abbreviations or shorthands are acceptable and can be easily handled by journal offices and publishers during data conversion; for example:
\newcommand{\grb}{gamma ray burst}\newcommand{\bHa}{Broad line H{\alpha}}
However, abbreviations that attempt to define new symbols by using LaTeX commands for repositioning text tend to cause problems in the publication process and should be avoided. In particular, author-defined commands that use any of the commands listed below are apt to cause problems during data conversion.
hskip, \vskip, \raise, \raisebox, \lower, \rlap, \kern, \lineskip, \char, \mathchar,
\mathcode, \buildref, \mathrel, \baselineskip
Consequently, authors are strongly discouraged from using them. In addition, AASTeX already has defined commands for all the major astronomical journals so authors should refrain from using their own as it generally leads to conflict errors during compilation.
Extra symbols are defined for AASTeX, some specifically for an astronomical context, others more broadly used in math and physics. In particular, the AMS has additional symbol fonts that are available in a standard LaTeX package (amssymb). All of these symbols are depicted in the additional symbols tables supplied with the package and on the AASTeX website.
Before defining a new symbol command, authors are advised to consult these tables to see whether the symbol they need already exists. If it does, they should use the corresponding markup command. Authors should not redefine existing command names. When one of these commands is encountered in an electronic manuscript submitted to a journal, an author’s redefinition will be ignored and the originally-defined command used.
A number of markup commands are available to timestamp important dates during the peer review process to document the publication history. These commands are not required as this information is pulled from the peer review database after acceptance and inserted by the publisher during production. Authors may find these commands useful for arXiv submissions.
\received{receipt date}\revised{revision date}\accepted{acceptance date}\published{published date}\submitjournal{AASJournal name}
These commands will appear after the affiliation information and before the abstract. The text “Submitted to” is appended to the AASJournal name argument in the \submitjournal command. The first four commands will be typeset on a single line, separated by semicolons, and surrounded by parentheses. The typeset order will always be received, revised, accepted, and published but the commands can be listed in any order in the latex manuscript. If a date command is not provided it will be omitted in the typeset list. Note that authors can use any date format but published articles use Year Month Day.
The \reportnum{ID} command can be used to indicate additional manuscript information. This command will place the “ID” argument text in the upper right corner of the title page. This command can be used multiple times. For example:
\reportnum{astro-ph/0411275}
\reportnum{BAAS 2004, v36, n5}
Note that these commands are not used during production but authors might find it useful to use them to provide publishing meta-data in preprints.
An optional water mark can be superimposed over the title page using the following commands.
\watermark{text}\setwatermarkfontsize{dimension}
The first command will print text in a light gray color on the title page running diagonally from the bottom left to the top right. The font size can also be specified by the second command, e.g. 2in, to obtain the appropriate size. Authors may have to experiment with the wording and font size to obtain a desired result. The water mark information is not used during production but authors might find it useful to identify drafts or preprints.
Authors may supply optional running head information using the following commands.
\shorttitle{text}\shortauthors{text}
Two different kinds of data are generally supplied in running heads. A shortened author list (last names, possibly truncated as “et al.”) appears at the top of even-numbered pages while an abbreviated form of the manuscript title appears on the top of odd-numbered pages. The information in these commands will be passed through to copy editing staff for inclusion in the published version but only the short authors information will be shown in the html.
The information contained within these commands should be brief. A good rule of thumb is to limit the list of authors to three or else use “et al.,” and to limit the short form of the title to 40-45 characters. The editors may choose to modify the author-supplied running heads.
The short author list will be anonomized when the anonymous style option is used.
The preamble is a control section. None of the markup that appears in the preamble is in fact typeset. The author must include a
\begin{document}
command to identify the beginning of the main, typeset portion of the manuscript.
The way AASTeX v6.3.1 handles author, affiliation, and collaboration information is different from previous versions so authors should read this section carefully. There are many reasons for these changes including updates in how article titles are displayed, the addition of ORCID support, automatic affiliation indexing, improved collaboration identification, and additional article meta-data commands for preprints. The following older commands are now removed: \affil, \altaffilmark, \altaffiltext, \fullcollaborationName, and \and. LaTeX will issue an error and stop if these are encountered in an AASTeX v6.3.1 manuscript.
Use the \title command to specify the title. Footnotes can be included within this command. In v6.3.1 the title is rendered in bold. This change was implemented to match the published article which is now shown in title case, e.g. only capitalizing the first letter of principle words. It is the author’s responsibility to maintain title case within the \title command.
The \author command is used to specify an individual author. Authors’ names should be entered in mixed case. Authors can use the LaTeX CJK macro package to include Chinese, Japanese and Korean language support with their names. More information about using CJK can be found here. A new optional argument to the \author command has been added to provide the author’s unique ORCID identifier. The syntax is:
\author[dddd-dddd-dddd-dddd]{Author Name}
During compilation, LaTeX will check that the value in the optional argument has this format. If not, a warning message will be issued and LaTeX will exit. When a valid format is entered the author name will be hyperlinked to the given ORCID webpage. If the orcid-ID.png file (available in the aastexv6.3.1 distribution) is present in the manuscript directory or in the LaTeX path the ORCID icon will appear after the author’s name to further increase ORCID visibility. Note that it is the author’s responsibility to ensure that the correct ORCID is provided when this functionality is used. At this time the ORCID is not carried into the peer review database since these identifier must be personally authenticated via the ORCID website.
Each \author command should be have an associated \affiliation command to specify a primary affiliation. AASTeX v6.3.1 will automatically index all the \affiliation commands during compilation. When a duplicate \affiliation command is encountered it is given the same index number as the first \affiliation found. Physical and postal address information for the specified institution should be included with \affiliation. The address can be broken over several lines using the \\ command to indicate the line breaks. Use multiple \affiliation calls for secondary and tertiary affiliations.
Authors often have additional information that needs to be noted (e.g. Hubble Fellow, author is deceased, etc.) in addition to their affiliation information. This information may be specified with the \altaffiliation command. Note that in order to work correctly the \altaffiliation command must appear right after the \author command as the corresponding footnote symbol is attached to the previous text. The \altaffiliation footnotes are non-numeric and rendered at the bottom left of the page.
All affiliation information can be hidden with the new \suppressAffiliations command. This command should appear before the first \author call.
There are two other optional pieces of author information that can be included. Both appear in the bottom left corner of the title page. The first is the new \correspondingauthor{Author Name} command. This will identify the named author as the corresponding author. It should only be used once for the author that was the primary contact during peer review. The other command is \email. Each \email call will placed on its own line thus when many emails are provided it is recommended they all be put in a single \email call. The order in which these two optional commands are called determines order in which they appear on the page.
The \collaboration command should be used to identify all authors in a collaboration group. This command is placed after the corresponding author group. \collaboration is slightly different in AASTeX v6.3.1 as it now takes an additional argument.
\collaboration{number}{name}
The name argument is the same as in v6.2 and is simply the collaboration identifier. The number argument gives the number of authors above to show in addition to the collaboration identifier. This should only be used when there are very large author list and only the first few authors are to be displayed in the front matter of the manuscript. For example,
\author{1}
...
\author{1000}
\collaboration{2}{The BIG collaboration}
would be displayed as “1 and 2 et al. The BIG collaboration“. When suppressing some of the authors in the collaboration it is recommended that authors use the \suppressAffiliations command described above for the cleanest look.
The full author list, including the affiliations, will be shown at the end of the article when the \allauthors command is placed just before the \end{document}.
Depending on the group complexity and number of collaborations, authors may also have to use the updated \nocollaboration command to segregate authors that are not part of any group. \nocollaboration also takes a number argument so that these authors can be removed from the front matter. In the compiled version a dash is shown to offset the unaffiliated group from the other collaborations.
The following example illustrates how the author and affiliation commands entered and authors are grouped in collaborations. This specific example only shows the collaboration names in the compiled output (below). Note that LaTeX takes care of any needed “and”s and commas between author names and thus it is not necessary to include them in an \author call. This footnote based style is the default for the front matter. It produces the most compact output and thus is ideal for manuscripts with long author lists. The longauthor style can be called as a classfile argument to produce the more traditional style where each author is listed individually. See Section 3 for details on using the different styles.
|

Note that this author limiting command is only meant to be used to make lengthy author lists more manageable for PDF copies during peer review. Authors are still required to include all authors and affiliation information with the corresponding commands outlined above. The full set of authors is critical both during peer review and publication. During submission, the peer review system uses this author and affiliation information to populate author meta-data which greatly helps the science editor in selecting the appropriate reviewer. All authors should be shown in manuscript with less than 20 authors. Conversely, manuscripts with more than 40 authors should only show a subset in the front matter with the full set in the back matter.
Lastly, authors that wish to to keep all of the title page information separate from the main body of the manuscript should use the \NewPageAfterKeywords command. This will introduce a page break so that the first section of the manuscript starts on a new page. This command is used after the \documentclass command and before the \begin{document} command.
A manuscript’s abstract should be marked with the abstract environment.
\begin{abstract}abstract text\end{abstract}
The abstract length is limited to 250 words for the ApJ, ApJ Letters, ApJ Supplements, AJ, and PSJ. The limit is 150 for RNAAS manuscript. The abstract list is checked at submission and authors that exceed this amount will be asked to reduce the abstract word count.
As of Monday, June 3rd, 2019, the AAS journals will categorize articles using Unified Astronomy Thesaurus (UAT) concepts instead of the old subject keywords system. More information about UAT concepts can be found here
The keyword command will remain in AASTeX as there may be other reasons to use the old system (ArXiv postings, internal reports, etc.) but for new AAS manuscripts authors are discouraged from using this mark up. Instead, authors will be prompted for UAT concepts during the submission process.
The syntax for authors that require the old subject headings is a single piece of text.
\keywords{text}
Authors should supply no more than six keywords, specified in alphabetical order. The \keywords command will append “Subject headings: ” to the given keywords. The last (2013) AAS endorsed list of allowed astronomical keywords can be found here.
AASTeX supports four levels of section headings.
\section{heading}\subsection{heading}\subsubsection{heading}\paragraph{heading}
Section headings should be given in upper case while subsections are in mixed case. Note that these commands delimit sections by marking the beginning of each section; there are no separate commands to mark the ends.
Authors are encouraged to embed their figures and tables around the sections where they are first mentioned. Placing tables and figures after the text was necessary in the past when the article charges were based on the number of print pages. Now article charges are based on more quantifiable metrics such as the number of words, tables, and figures, thus the “readability” of a manuscript is more important, particularly during peer review.
Authors can use the positional placement option on figures and tables to override LaTeX‘s internal placement logic. The most useful arguments in this option are “h” to place at the approximate location specified in the LaTeX manuscript, i.e. here, “b” place at the bottom of the current page, “t” place a the top of the current page, and “!” force LaTeX to ignore its own determined location. The example,
\begin{figure}[htb!]
tells LaTeX to optimize the figure position by first considering here, then the top of the page, and finally at the bottom. The LaTeX derived position is not considered. Similar positional placement options can be invoked for tables and deluxetables.
Acknowledgments should placed inside the new acknowledgments environment.
\begin{acknowledgments}One or more paragraphs of text.\end{acknowledgments}
In the AASTeX style, acknowledgments are after the main body of text but before the bibliography. This section will be replaced with (Acknowledgements anonymized for review) when the anonymous style is used. See Section 3 for details.
Note that use of the AASTeX v6.3 command \acknowledgments in a v6.3.1 manuscript will produce an error in the .log file and in the compiled pdf.
To help organizations obtain information on the effectiveness of their telescopes, the AAS has created a group of keywords for telescope facilities. Including a facility keyword list is optional but encouraged. The facilities keyword list is available here.
The facilities list should appear after the acknowledgments section.
\facility{facility ID}or
\facilities{facility ID, facility ID, facility ID, ... }
As part of the facility ID argument, the author may also include the name of the instrument in parentheses, e.g. HST(WFPC2) or MMT(Blue channel spectrograph). Use \facility when only a single facility was used and \facilities for multiples. Separate each facility keyword with a comma. There is no limit to the number of facility keywords that may be included in a manuscript.
Authors should use the \software command to highlight the software packages that were used in the production of the article, especially those not mentioned in the text. This is analogous to acknowledging a major facility or instrument and is done for the same reason, to give credit to a project which is generally useful for the community. Listing the software and which version used also helps with reproducibility. The \software command should also appear after the acknowledgments section.
\software{CASA (McMullin et al. 2007),
XSPEC (Arnaud 1996),
astropy (The Astropy Collaboration 2013, 2018),
... }
A single \software command should be used to format a comma delimited list of software citations. Please do not add other contextual material to this markup nor include programming languages. There is no limit to the number of software that may be included in this comma-delimited list. Authors should include the preferred citation or a URL link when no citation is available. Check with the ASCL for citations for many common codes and software packages.
When one or more appendices are needed in a manuscript, the point where the main body text ends and the appendix begins should be marked with the \appendix command.
\section{body section}\appendix\section{appendix section}
The \appendix command takes care of a number of internal housekeeping concerns, such as identifying sections with letters instead of numerals, and resetting the equation counter. Sections in the appendix should be headed with \section commands where each appendix section will have an alphabet numbering scheme, e.g. A, B, C, etc.
The default table and figure labeling in AASTeX v6.3.1 is to continue the sequential numbering from the body of the manuscript into the appendix. If the command \restartappendixnumbering is used anywhere in the manuscript the figure and table numbers will be reset to one in each section with the section letter appended to the front, e.g. Figure A1, A2 or Table B1 and C1. Equations labeling always follows this format.
Display equations can be typeset in LaTeX in a number of ways. The following three are probably of greatest use in AASTeX.
\begin{displaymath}\end{displaymath}\begin{equation}\end{equation}\begin{eqnarray}\end{eqnarray}
The displaymath environment will break out a single, unnumbered formula. The equation environment does the same thing except that the equation is auto-numbered by LaTeX. To set several formula in which vertical alignment is required, or to display a long equation across multiple lines, use the eqnarray environment. Each line of the eqnarray will be numbered unless a \nonumber command is inserted before the equation line delimiter (\\). LaTeX‘s equation counter is not incremented when \nonumber is used.
Authors may occasionally wish to group related equations together and identify them with letters appended to the equation number. When this is desired, use the subequations environment in the amsmath package (note that amsmath is already included in all LaTeX distributions after 2005 but it must be explicitly called in the preamble via \usepackage{amsmath}).
\begin{subequations}...\end(subequations}
All equations within this environment will be number with the previous equation number but appended with a letter. See the amsmath documentation, section 3.11.2, for additional details.
It is possible to override LaTeX‘s automatic numbering within the equation or eqnarray environments using
\eqnum{text}
When \eqnum is specified inside an equation environment or on a particular equation within an eqnarray, the text supplied as an argument to \eqnum is used as the equation identifier. LaTeX‘s equation counter is not incremented when \eqnum is used. \eqnum must be used inside the math environment.
If, as a consequence of the use of \eqnum or \nonumber, LaTeX‘s equation counter gets out of synch with the author’s intended sequence, the counter may be reset to a particular value.
\setcounter{equation}{number}
The equation counter should be set to the number corresponding to the last equation that was formatted; therefore, it is most appropriate for this command to appear immediately after an equation or eqnarray environment. The command must be used outside the math environments.
Bibliographic data supplied by the author in the reference list must conform to the standards of the AAS journals. The specific citation and bibliography styles are outlined here. Fortunately there are two easy options for properly marking citations and formatting reference lists. They are the standard LaTeX thebibliography environment, and the AASTeX references environment. Authors are strongly encouraged to use thebibliography.
The preferred method for reference management is to use LaTeX‘s thebibliography environment, marking citations in the body of the manuscript with \citep or \citet and associating references with them using \bibitem. The \cite-\bibitem mechanism associates citations and references symbolically while maintaining proper citation syntax within the manuscript. In the \bibitem command, the author should specify citation data inside square brackets and a citation key in curly braces for each reference. (The bibitem command is described in detail in the next section.)
\begin{thebibliography}{dummy}\bibitem[cite data]{key} bibliographic data..\end{thebibliography}
Note that the argument dummy to the start command of the environment is not used in the AASTeX package, but it is included to be consistent with the syntax of standard LaTeX. It is acceptable to simply insert an empty pair of curly braces at the end of the \begin{thebibliography} command.
AASTeX uses the natbib package for citation management. The natbib package re-implements LaTeX’s cite command, offering greater flexibility for managing citations in the author-year form. Specific instructions on how to use natbib is available here.
When using natbib, bibliographic data are defined in bibitem commands.
\bibitem[author(year)]{key}bibliographic data
The square-bracketed argument of the bibitem contains the author portion of the citation followed by the year set off in parentheses. The parentheses are important-natbib uses them to determine the year portion of the citation-so be sure to include them. The argument key in curly braces is the code name by which the citation is referenced in the text.
When placing citations in the text, the author should use either a citep or a citet command.
\citep{key(s)} \citet{key(s)}
The citep command produces a citation that is entirely set off by parentheses, e.g. “(Cox 1995),” while citet permits the author’s name to form part of the text, e.g. “Cox (1995).” The plain LaTeX cite command behaves like citet.
The citation key must correspond to the key in a bibitem command. During processing, information from the square-bracketed argument of the key’s bibitem is inserted in the text at the location of the \cite command. Multiple citation keys are separated by commas, e.g., citep{knuth84,cox95,lamport94}.
citep and citet each take optional arguments that specify extra text to be appended to the citation label. Text in the first set of square brackets will appear before the cite while text in the second set will appear after it. For instance, citep[chap. 2]{jon90} would produce the citation “(Jones et al., 1990, chap. 2),” citep[see][]{jon90} would produce “(see Jones et al, 1990),” and citep[see][chap. 2]{jon90}would print “(see Jones et al., 1990, chap. 2).” In addition, the * form of the cite commands will print the full author list instead of the abbreviated form.
The syntax discussed above should be sufficient for the vast majority of cases; however, AASTeX does use the full natbib implementation, so many more syntax options are available.
Authors are also encourage to use reference management software such as BibTex to organize their references and produce correct bibliographies. When using BibTeX a .bst file is need to produce the proper reference output that follows the AAS Journal’s format. Authors should use the latest aasjournal.bst file when using BibTex with AAS Journal manuscripts.
It is not possible to use \bibitem within AASTeX’s references environment ( 2.14.3), nor will \cite commands work properly in the main body if \bibitem commands are absent.
Some authors might prefer to enter citations directly into the body of an article. If so, the references environment may be used to format the reference list. The references environment simply sets off the list of references and adjusts spacing parameters.
\begin{references}\reference{key} bibliographic data..\end{references}
AASTeX v6.3.1 defines journal abbreviations for a large number of major astronomical journals. The list is given below. For others not in this list authors are encouraged to use standard journal abbreviations defined by ADS.
| Command | Journal |
|---|---|
| \aj | Astronomical Journal |
| \araa | Annual Review of Astronomy and Astrophysics |
| \apj | Astrophysical Journal |
| \apjl | Astrophysical Journal, Letters |
| \apjs | Astrophysical Journal, Supplement |
| \ao | Applied Optics |
| \apss | Astrophysics and Space Science |
| \aap | Astronomy and Astrophysics |
| \aapr | Astronomy and Astrophysics Reviews |
| \aaps | Astronomy and Astrophysics, Supplement |
| \azh | Astronomicheskii Zhurnal |
| \baas | Bulletin of the AAS |
| \icarus | Icarus |
| \jrasc | Journal of the RAS of Canada |
| \jaavso | Journal of the American Association of Varialbe Star Observers |
| \memras | Memoirs of the RAS |
| \mnras | Monthly Notices of the RAS |
| \pra | Physical Review A: General Physics |
| \prb | Physical Review B: Solid State |
| \prc | Physical Review C |
| \prd | Physical Review D |
| \pre | Physical Review E |
| \prl | Physical Review Letters |
| \psj | Planetary Science Journal |
| \pasp | Publications of the ASP |
| \pasj | Publications of the ASJ |
| \qjras | Quarterly Journal of the RAS |
| \skytel | Sky and Telescope |
| \solphys | Solar Physics |
| \sovast | Soviet Astronomy |
| \ssr | Space Science Reviews |
| \zap | Zeitschrift fuer Astrophysik |
| \nat | Nature |
| \iaucirc | IAU Cirulars |
| \aplett | Astrophysics Letters |
| \apspr | Astrophysics Space Physics Research |
| \bain | Bulletin Astronomical Institute of the Netherlands |
| \fcp | Fundamental Cosmic Physics |
| \gca | Geochimica Cosmochimica Acta |
| \grl | Geophysics Research Letters |
| \jcp | Journal of Chemical Physics |
| \jgr | Journal of Geophysics Research |
| \jqsrt | Journal of Quantitiative Spectroscopy and Radiative Trasfer |
| \memsai | Mem. Societa Astronomica Italiana |
| \nphysa | Nuclear Physics A |
| \physrep | Physics Reports |
| \physscr | Physica Scripta |
| \planss | Planetary Space Science |
| \procspie | Proceedings of the SPIE |
| \actaa | Acta Astronomica |
| \caa | Chinese Astronomy and Astrophysics |
| \cjaa | Chinese Journal of Astronomy and Astrophysics |
| \jcap | Journal of Cosmology and Astroparticle Physics |
| \na | New Astronomy |
| \nar | New Astronomy Review |
| \pasa | Publications of the Astron. Soc. of Australia |
| \rmxaa | Revista Mexicana de Astronomia y Astrofisica |
| \maps | Meteoritics and Planetary Science |
| \aas | American Astronomical Society Meeting Abstracts |
| \dps | American Astronomical Society/Division for Planetary Sciences Meeting Abstracts |
The AAS Journals encourages authors to include data with their articles. In many cases this data can be included with the article, see Section 2.17, but sometimes the data is either too large or too complex to include. In these cases the AAS Journals recommend the author place their data in a trusted 3rd party repository that issues Digital Object Identifiers (DOIs) and properly cite the data in the bibliography. Likewise software and code in persistent repositories should also be linked to the main journal by DOI. The new policy statement on software can be found here.
The format for referencing digital objects in repositories is as follows:
{author*} {year}, {title}, {version^}, {publisher|howpublished~}, {prefix}:{identifier#}
To illustrate and document this format, we use a corresponding BibTeX entry taken and modified from a real example). Note that all data/software BibTeX entries should be of the @misc type:
@misc{lia_corrales_2015_15991,
author       = {Lia Corrales},
title        = {{dust: Calculate the intensity of dust scattering halos in the X-ray}},
month        = mar,
year         = 2015,
doi          = {10.5281/zenodo.15991},
version      = {1.0},
publisher    = {Zenodo},
url          = {https://doi.org/10.5281/zenodo.15991}
}
The corresponding reference entry should look like:
Corrales, L. 2015a, dust: Calculate the intensity of dust scattering halos in the X-ray, v1.0, Zenodo, doi:10.5281/zenodo.15991
BibTeX will produce a citation in this format when the new aasjournal.bst file is used. The aasjournal.bst is an update of the old apj.bst file and is backwards compatible. Lastly, a quick tip to get BibTeX for almost any DOI is to use curl:
curl -LH "Accept: application/x-bibtex" https://doi.org/10.5281/zenodo.15991
If an author wishes to embed graphics in a manuscript, it is necessary that the graphics files conform to either the Encapsulated PostScript (EPS) or PDF standard. Use a package like epstopdf to convert EPS files to PDF if using pdflatex or a mixture of figure formats.
Several commands are available for including EPS/PDF files in AASTeX manuscripts. They should be placed within the figure environment.
\begin{figure}\figurenum{text}\epsscale{num}\plotone{file}\plottwo{file1}{file2}\caption{text}\end{figure}
In the onecolumn style the figure will span the same width of the text. Figures in the twocolumn style will likewise only span the column they are placed in. An author can override this by adding an asterisk, e.g. \begin{figure*}...\end{figure*}, to have a figure span both columns. Authors are responsible for producing figures that are not so small to be unreadable.
When \figurenum is specified inside the figure environment, the text supplied as an argument to \figurenum will be used as the figure identifier. LATEX’s figure counter is not incremented when \figurenum is used. \figurenum must be used inside the figure environment.
\plotone inserts the graphic in the named EPS/PDF file, scaled so that the horizontal dimension fits the width of the body text; the vertical dimension is scaled to maintain the aspect ratio. \plottwo inserts two image files next to each other. Scale factors are determined automatically from information in the EPS/PDF file.
The automatic scaling may be overridden with the command \epsscale{num}, where num is a scaling factor in decimal units, e.g., 0.80.
The plotone and plottwo macros are invocations of the graphicx \includegraphics command. In most instances, using plotone or plottwo should work for placing figures in AASTeX documents. However, if more flexibility is needed, the includegraphics command may be invoked directly. For instance, to rotate an image by 90 degrees, use
\includegraphics[angle=90]{epsfile}
See the graphicx wiki page or package documentation for more information about \includegraphics.
All electronic art in a manuscript must have a figure caption or legend. The \caption command within the figure environment is the most commonly used method but AASTeX also supports \figcaption which has similar functionality.
\caption{text\label{key}}\figcaption[filename]{text\label{key}}
The optional argument, filename, can be used to identify the file for the corresponding figure; text refers to the caption for that figure. The author may provide a \label with a unique key for cross-referencing purposes.
When either the \caption or \figcaption commands are used, the figure identification label, e.g., “Figure 1,” is generated automatically by the command itself, so there is no need to key this information. There is an upper limit of seven, figure captions per page. Footnotes are not supported for figures.
Starting with AASTeX 6.0 there is a new way to create a figure that consists of > 2 EPS or PDF files arranged in a grid pattern. The new command \gridline allows an author to place as many figure files as needed in a row through multiple \fig, \rightfig and \leftfig calls. The \fig calls an individual EPS or PDF file while \rightfig and \leftfig do the same but right and left justify the named file within the grid row. There is also the \boxedfig call which is the same as \fig but draws a box around the named file.
\fig{filename}{width}{letter or caption}
The first argument is the EPS or PDF file to be displayed. The second argument is the width to scale the file by. Any LATEX accepted width is valid but author may find it easier to use \textwidth scale the figure by a fraction of the allowed width. For example, 0.33\textwidth will scale the figure to one-third the column width. The last argument provides a sub caption beneath the displayed file. Authors should use this to label the displayed file, e.g. “(a)”, “(b)”, etc.
There is a final file call for \gridline, \rotatefig. Similar to the others, this file call takes an additional argument to specify the degree of rotation. An example would be \rotatefig{90}{filename}{width}{subcaption} to produce a 90 degree rotation.
With multiple \gridline commands an author can construct figures consisting of numerous files and in complex arrangements. The following example will create an figure with three individual files on the top, 2 individual files in the middle, and one file on the bottom, all labeled “(a)” through “(f)”.
\begin{figure}
\gridline{\fig{fig1a.pdf}{0.3\textwidth}{(a)}
          \fig{fig1b.pdf}{0.3\textwidth}{(b)}
          \fig{fig1c.pdf}{0.3\textwidth}{(c)}}
\gridline{\fig{fig1d.pdf}{0.3\textwidth}{(d)}
          \fig{fig1e.pdf}{0.3\textwidth}{(e)}}
\gridline{\fig{fig1f.pdf}{0.3\textwidth}{(f)}}
\caption{A nice inverted pyramid figure
consisting of six individual files}
\end{figure}

There is support in the AASTeX package for tables via two mechanisms: LATEX’s standard table environment, and the deluxetable environment, which allows for the formatting of lengthy tabular material. Tables may be marked up using either mechanism, although use of deluxetable is preferred. deluxetable is also the only table environment that natively supports long tables. Authors should not use the LATEX tabbing environment when preparing electronic submissions.
Authors are encouraged to use the deluxetable environment to format their tables since it automatically handles many formatting tasks, including table numbering and insertion of horizontal rules. It also provides mechanisms for breaking tables and controlling width and vertical spacing that are unavailable in the LATEX tabular environment. An online tool is available to help create deluxetables.
The deluxetable environment is delimited by LATEX’s familiar \begin and \end constructs. The content consists of preamble commands and table data, the latter delimited by \startdata and \enddata.
\begin{deluxetable}{cols}preamble commands\startdatatable data\enddata\end{deluxetable}
The argument cols specifies the justification for each column. An alignment token, “l,” “c,” or “r,” is given for each column, indicating flush left, centered, or flush right.
There are many commands available in deluxetable to control the output. Commands that control the structure of the entire table must be specified before the \begin{deluxetable} call but note that there are a few exceptions. The exceptions will be pointed out when these commands are described. Multi-page deluxetables are created by including a \startlongtable before the deluxetable call.
\startlongtable
\begin{deluxetable}
...
\end{deluxetable}
If \startlongtable is left out a long table will flow off the page.
Wide tables will not always center properly when using the commands above. For wide, portrait tables the command \centerwidetable at the top of the deluxetable environment should be used first. If this command does not produce the desired results authors can manually move a wide, portrait table with the \movetableright=X where X is a recognized LaTeX unit such as in (inches) or mm (millimeters).
\movetableright=-1in
will move the table to the left 1 inch. This command appears before the \begin{deluxetable} call.
Landscape orientation, e.g. rotation, is available for both deluxetables and the tabular environment but how this is accomplished in v6.3.1 is slightly different than in versions v6.0 and earlier. The previous \rotate has been superceded by the superior rotatetable environment. This environment should surround all short tables requiring rotation.
\begin{rotatetable}
\begin{deluxetable}
...
\end{deluxetable}
\end{rotatetable}
While the \rotate command can still be used it is only recommended the rotation of splittables, see the cheat sheet chart in Section 2.16.5 for examples. Likewise, the new longrotatetable environment is used to rotate a multi-page deluxetable.
When using the rotatetable or longrotatetable environments the resulting table may spill over the top margin, particularly for wide tables. In these cases authors can adjust the landscaped table further down the page using the new \movetabledown=X command. This command is works in the same way as \movetableright=X works for wide portrait tables. For example,
\movetabledown=3mm
will move the landscape table down 3 millimeters. This command also appears before the \begin{deluxetable} call.
The * option informs LATEX that a table (or figure) will span both columns in a two column style.
\begin{deluxetable*}
...
\end{deluxetable*}
or
\begin{table*}
...
\end{table*}
When the * option is used, it can also be applied to the rotatetable environment to center the rotated table on the page otherwise the table will be left justified. See the cheat sheet chart in Section 2.16.5 for examples.
There other deluxetable commands must be used in the preamble inside the deluxetable environment.
\tabletypesize{font size command}\tablewidth{dimen}\tablenum{text}\tablecolumns{num}\tablecaption{text\label{key}}\tablehead{text}
If a table is too wide for the PDF/EPS page, the font size of the table can be changed with the \tabletypesize command, which takes as an argument one of the font size change commands: \small (11pt), \footnotesize (10pt), or \scriptsize (8pt).
The width of a deluxetable is defined by \tablewidth. If this command is omitted, the default width is the width of the page. The table can be set to its natural width by specifying a dimension of 0pt. Long tables may have a natural width that is different for each page. The natural width for each page will be printed to the log file during processing. Authors may then use this log information to define a fixed table width in order to give the table a more uniform appearance across pages.
It is possible to override LATEX‘s automatic numbering within the deluxetable environment. When \tablenum is specified inside a deluxetable preamble, the text supplied as an argument to \tablenum will be used as the table identifier. LATEX‘s equation counter is not incremented when \tablenum is used.
The caption (actually, the title) of the table is specified in \tablecaption. The text of \tablecaption should be brief; explanatory notes should be specified in the end notes to the table (see 2.16.5 below). If the caption does not appear centered above the table after processing, then specify the width of the table explicitly with the \tablewidth command and rerun LATEX on the file. If an author supplies a \label for cross-referencing purposes, this, too, must be included in the \tablecaption.
Column headings are specified with \tablehead. Within the \tablehead, each column heading should be given in a \colhead, which will ensure that the heading is centered on the natural width of the column. There should be a heading for each column so that there are as many \colhead commands in the \tablehead as there are data columns.
\tablehead{\colhead{heading} & \colhead{heading}}
If more complicated column headings are required, any valid tabular command that constitutes a proper head line in a LATEX table may be used. For example, the multicolumn command below would create a table head with text centered over five columns.
\multicolumn{5}{c}{text}
The \tablecolumns{num} command is necessary if an author has multi-line column headings produced by \tablehead or other LATEX commands and is using either the \cutinhead or \sidehead markup (see below). The num argument should be set to the true number of columns in the table. The command must come before the \startdata command.
After the table title and column headings have been specified, data rows can be entered. Data rows are delimited with the \startdata and \enddata commands. The end of each row is indicated with the standard LATEX \\ command. Data cells within a row are separated with & (ampersand) characters.
\startdatadata linecell&cell&cell \\more data lines\enddata
Column alignment within the data columns can be adjusted with the TeX \phantom{string} command, where string can be any character, e.g., \phantom{$\arcmin$}. A blank character of width string is then inserted in the table. Four commands have been predefined for this purpose.
\phn phantom numeral 0-9 \phd phantom decimal point \phs phantom ? sign \phm{string} generic phantom
Extra vertical space can be inserted between rows with an optional argument to the \\ command.
\\[dimen]
The argument is a dimension and may be specified in any units that are legitimate in LATEX.
In a table, it may happen that several rows of data are associated with a single object or item. Such logical groupings should not be broken across pages. In these cases, the tablebreak command may be used to force a page break at the desired point.
table row\\tablebreaknext table row
This command can be used any time that the default deluxetable page breaks need to be overridden.
To explicitly indicate that a table cell that contain no data, the \nodata command can be used. This is to differentiate such cells from blank cells, which are frequently interpreted as implicitly repeating the entry in the corresponding cell in the row preceding.
Within the deluxetable body, two kinds of special heads are allowed, cutinhead and sidehead. A cut-in head is a piece of text centered across the width of the table. It is spaced above and below from the data rows that precede and follow it and will appear set off by rules in the LATEX output. Similarly, the command for a side head produces a row spanning the width of the table but with the text left justified.
\cutinhead{text}\sidehead{text}
Table footnotes (more properly, table end notes) may also be used in the deluxetable environment. Their use is described in detail in Section 2.16.5.
Authors may also compose tables using the table environment.
\begin{table}\end{table}
The table environment encloses not only the tabular material but also any title or footnote information associated with the table.
Titles, or captions, for tables are indicated with a caption command
\caption{text\label{key}}
A table label, e.g. “Table 2,” is generated automatically by \caption. The author may provide a \label in the caption with a unique keyfor cross-referencing purposes.
The table body should appear within the tabular environment.
\begin{tabular}{cols}\end{tabular}
The alignment tokens in cols specify the justification for each column. The letters “l,” “c,” or “r” is given for each column, indicating left, center, or right justification. See the wiki for additional information about using the tabular environment to prepare tables.
Each tabular table must appear within a table environment. There should be only one tabular table per table environment.
Use the tableline command to insert horizontal rules in the tabular environment.
\tableline
The use of vertical rules should be avoided.
As with the deluxetable environment, it is possible to override LATEX’s automatic numbering within the table environment using \tablenum. \tablenum must be used inside the table environment.
AASTeX supports footnotes and end notes within tables; this support applies to both the deluxetable environment and the standard LATEX table environment.
Footnotes for tables are usually identified by lowercase letters rather than numbers. Use the tablenotemark and tablenotetext commands to supply table footnotes. A a note label, usually a letter, is required.
\tablenotemark{key letter(s)}\tablenotetext{alpha key}{text}
The key letter of the tablenotemark should be the same as the alpha key for the corresponding text. It is the responsibility of the author to make the correspondence correct.
Sometimes authors tabulate materials that have corresponding references and may want to associate these references with the table. Authors may also wish to append a short paragraph of explanatory notes that pertain to the entire table. These elements should be specified with the commands below.
\tablerefs{reference list}\tablecomments{text}
The \tablenotetext, \tablecomments, and \tablerefs commands must be specified after the \end{tabular} or \enddata and before the closing \end{table} or \end{deluxetable}.
AASTeX 6.0 introduced five new features to make and display tabular information. The author must have the most current AASTeX classfile in order to use these features. All of these features can be use together in a single table. Examples are available in the AASTeX 6.0 documentation.
Entire columns can be “hidden” from display with the use of the new “h” cols column identifier. For example the LATEX table environment
\begin{tabular}{chc}\hlineone & two & three\\\hline\hlinea & b & c\\\hline\end{tabular}
or AASTeX deluxetable environment
\begin{deluxetable}{chc}\tablehead{\colhead{one} & \nocolhead{two} & \colhead{three}}\startdataa&b&c\\\enddata\end{deluxetable}
will only display columns “one” and “three”. The second column, “two”, will not be shown when compiled. In deluxetable the command \nocolhead has to be used instead of \colhead to hide a specific column header. Alternatively, \multicolumn1c can also be used to hide a header in deluxetable. Note that the hidden column still appears in the LATEX manuscript. Authors are responsible for removing any unneeded column data or alerting the editorial office about how to treat these columns in during production for the final typeset article.
The use of mathematics and special symbols requires the use of math-mod or in other words prefaced with $s. Using capital letters, e.g. “C”, “L”, or “R”, in the cols column identifier will set that specific column in math mode so that $s are unnecessary. A LaTeX table environment example is shown below.
\begin{tabular}{cCR}\hlineone&two&\alpha\\\hline\hlinea & \sum^{n=0}_{0 \to 1} & 5\pm1\\\hline\end{tabular}
An another example but with AASTeX’s deluxetable.
\begin{deluxetable}{ClR}\tablhead{\colhead{Math} & \dcolhead{\beta} & \colhead{3} \\\stardata\frac{a}{b} & 1000 & $\sim a^{\prime}$ \\\enddata\end{deluxetable}
As shown in the second column header the command \dcolhead is used to enable math mode without $s in the header. The last column in the deluxetable shows that embedded $s will not affect capital cols and thus legacy tables can be used without worry.
Aligning columns by decimal can be tricky. Prior to AASTeX 6.0 the best way was to use phantom calls such as \phn to manually align each row. For long or wide tables this process can add significant overhead to get the decimals to align properly. AASTeX 6 introduces another new cols column identifier, “D”, to automatically align a column by decimal. While the process is similar for both LaTeX tables and AASTeX deluxetables the details are slightly different.
The process works by splitting a decimal column into two separate columns by the decimal and right justifying the first new column and right justifying the second new column. In addition to identifying the decimal column with a “D” in the cols column identifier, the author must include the \decimals call in the table. Since “D” columns are actually two column any headers should include an extra “&” in the LaTeX tabular environment or be described with the new \twocolhead{} in the deluxetables environment. Alternatively, \multicolumn2c will work to span two columns in a header in either environment. Each decimal column must end with space before “&” and empty decimal columns must be indicated with a period (‘.’). A LaTeX example is given below.
\begin{tabular}{rDD}\hline& & & \multicolumn2c{More} \\Column & \multicolumn2c{Decimals} & \multicolumn2c{Decimals}\\\hline\hline\decimalsOne & 567.0 & 21345 \\Two & 2.0 & 62.5 \\Three & 45 & 534.3499 \\Four & 21.12 & . \\\hline\end{tabular}
A similar example using AASTeX deluxetable and embedded plus or minus symbols to highlight the differences is given below.
\begin{deluxetable*}{cD@{+/-}D}\tablehead{\colhead{Letter} & \multicolumn2c{Value} & \multicolumn2c{Error} \\}\decimals\startdataA & 1234 & 100.0 \\B & 123.4 & 10.1 \\C & 12.34 & 1.01 \\D & 1.234 & 0.101 \\E & .1234 & 0.01001 \\\enddata\end{deluxetable*}
Note that the \decimals call comes before \startdata in deluxetable.
Wide tables can easily be split horizontally into two or three continuing subtables. An author would invoke splittabular or splitdeluxetable to allow this functionality. Both command take the optional “*” extension to allow the table to span both columns in the twocolumn format. A new “B” cols column identifier is defined to tell LaTeX where to introduce the split. Up to two “B” identifiers can be used. The output is a centered split table with a full horizontal line separating the two or three components. A LaTeX table example below shows how this split a simple table into halves.
\begin{splittabular}{cccBccc}\hlineone & two & three &four & five & six \\$alpha$ & $\beta$ & $\gamma$ & $\delta$ & $\epsilon$ & $\zeta$ \\\end{splittabular}
splitdeluxetable works in the same way and both will accept any of these calls in the table cols column identifier: c,l,r, or C,L,R, @{}, p{1in}, |, or ||, m{}, b{}, !{}, or a new column type defined with the \newcolumntype{}{} command.
The command \colnumbers can be included to automatically number each column in the header. The command works with all table types including the new split tables. Each column index number will be surrounded by parentheses. In a LaTeX table the \colnumbers should be invoked at the location where the author wants the numbers to appear. This should be after the last line of specified table header. In deluxetable this command has to come after \startdata. \colnumbers will not increment for columns hidden by the “h” command.
Note that when using decimal alignment the command \decimalcolnumbers must be used instead of \colnumbers and \decimals.
The following chart shows all the possible table permutations supported and how to obtained them with an AASTeX v6.3.1 manuscript. It includes the deluxetable, the tabular, and the new splittable environments in both single and two columns typeset styles, with or without landscape rotation, and over one or multiple pages.
| Description | Table type | Page length | Number of text columns spanned | Rotation | Manuscript column type1 | LaTeX table call |
|---|---|---|---|---|---|---|
| A single page deluxetable in a single column text style | deluxetable | less than one | one | None | single | \begin{deluxetable} ... \end{deluxetable} |
| A single page deluxetable spanning both columns in a double column text style | deluxetable | less than one | two | None | double | \begin{deluxetable*} ... \end{deluxetable*} |
| A multi-page deluxetable in a single column text style | deluxetable | more than one | one | none | single | \startlongtable \begin{deluxetable} ... \end{deluxetable} |
| A multi-page deluxetable spanning both columns in a double column text style | deluxetable | more than one | two | none | double | \startlongtable \begin{deluxetable*} ... \end{deluxetable*} |
| A single page, rotated, deluxetable in a single column text style | deluxetable | less than one | one | landscape | single | \begin{rotatetable} \begin{deluxetable} ... \end{deluxetable} \end{rotatetable} |
| A single page, rotated, deluxetable spanning both columns in a double column text style | deluxetable | less than one | two | landscape | double | \begin{rotatetable*} \begin{deluxetable*} ... \end{deluxetable*} \end{rotatetable*} |
| A multi-page, rotated, deluxetable in a single column text style | deluxetable | more than one | one | landscape | single | \begin{longrotatetable} \begin{deluxetable} ... \end{deluxetable} \end{longrotatetable} |
| A mulit-page, rotated, deluxetable spanning both columns in a double column text style | deluxetable | more than one | two | landscape | double | \begin{longrotatetable} \begin{deluxetable*} ... \end{deluxetable*} \end{longrotatetable} |
| A single page table in a single column text style | table | less than one | one | none | single | \begin{table} ... \end{table} |
| A single page table spanning both columns in a double column text style | table | less than one | two | none | double | \begin{table*} ... \end{table*} |
| A single page, rotated, table in a single column text style | table | less than one | one | landscape | single | \begin{table} \begin{rotatetable} \begin{center} \caption{} \begin{tabular} ... \end{tabular} \end{center} \end{rotatetable} \end{table} |
| A single page, rotated table spanning both columns in a double column text style | table | less than one | two | landscape | double | \begin{table*} \begin{rotatetable*} \caption{} \begin{tabular} ... \end{tabular} \end{center} \end{rotatetable*} \end{table} |
| A splittabular table in a single column text style | splittabular | less than one | one | None | single | \begin{splittabular} ... \end{splittabular} |
| A splitdeluxetable in a single column text style | splitdeluxetable | less than one | one | None | single | \begin{splitdeluxetable} ... \end{splitdeluxetable} |
| A splitdeluxetable spanning both columns in a double column text style | splitdeluxetable | less than one | two | None | double | \begin{splitdeluxetable*} ... \end{splitdeluxetable*} |
| A splitdeluxetable, rotated in a single column text style | splitdeluxetable | less than one | one | landscape | single | \begin{splitdeluxetable} \rotate ... \end{splitdeluxetable} |
| A splitdeluxetable, rotated and spanning both columns in a double column text style | splitdeluxetable | less than one | two | landscape | double | \begin{splitdeluxetable*} \rotate ... \end{splitdeluxetable*} |
Remember that for wide tables \movetableright and \movetabledown can be used to tweak the positions of portrait and landscape tables, respectively. Both commands will accept any recognized LaTeX units, e.g. pix, inch, etc., and negative values move the table in the opposite direction.
1. The default, preprint, manuscript and modern styles produce single column manuscripts. The two column and preprint2 styles produce double column manuscripts.
For many years now, the AAS journal of record has been the electronic version. One significant advantage of the move is that electronic delivery offers a substantially wider range of features and functionality that simply is not available in print or even PDF. These enhanced features allow authors to provide the data behind their articles and present that data in new and unique ways. The ultimate goal of all enhanced materials is to further the author’s vision and provide the reader with data that is discoverable and reusable. The presentation of different types of currently supported enhanced materials in the LaTeX document are provided below while specifics for the different data types and a graphics guide are also available for details on allowed types.
Long tables, i.e. more than 200 data lines, in AAS journal articles should be in the machine-readable format for presentation in the electronic edition. Complete MRT documentation is provided here.
For each machine-readable table, the author must include a short sample version of the full table in their LaTeX submission. The example table must be cited and numbered as if it were a regular table. This sample version will appear in PDF and HTML with the full data only available in the machine-readable format. The sample table should be 5 to 10 data lines long and include a table note at the end with text indicating that a machine-readable version will be available in machine-readable format. For instance,
\tablecomments{Table 1 is published in its entirety in the machine-readable format.
      A portion is shown here for guidance regarding its form and content.}
When a sample table will not fit on a print page, e.g. exceptionally wide tables, there are a number of tricks an author can use to make the table fit. The first is to use a landscaped table which can be accomplished with \rotatetable and \longrotatetable in deluxetable. Another option is to use a smaller font size width, see 2.16.2. Some new options available in AASTeX v6.+ include splitting the table into 2 or 3 parts, see 2.16.6.4, or hiding columns, 2.16.6.1, with the full version as a MRT. Any combination of these options can be used at the same time. In extreme cases or tables where the author wants to provide a more descriptive table, authors may also create a “meta-data” table that only provides the column meta data, e.g. column number, column descriptions, etc. An example can be found here.
Authors may include a portion or all of the data shown in any figure published in the AAS Journals. The data will be posted with the published article in a commonly accepted format, typically machine readable or FITS. Authors must indicate in the figure caption which portion of the displayed data is available as a DbF. An example caption would be “The BVRI photometry shown in panel b of this figure is available as the Data behind the Figure.”
Additional information about DbFs is available in the Data Guide
A figure set is the framework used to present a large compendia of similar images and graphical material. They have the added author benefit of simplifying quanta charges for related figures. Examples include identification charts, spectral libraries, model output, etc. The figure set functionality gives the reader the ability to quickly find specific images within the figure set sequence and thus is well suited in cases with many similar images.
Figure sets must be mentioned explicitly by number and appear in correct numerical order in the body of the text. At least one image in a series must be displayed as an example figure for the PDF version of the final article. The corresponding caption should indicate that additional images are available in the Figure set. For example,
"The complete figure set (11 images) is available in the online journal.
The markup required to produce a figure set is included in all AASTeX 6+ versions. The commands to construct a figure set are as follows.
\figsetstart\figsetnum{figurenumber}\figsettitle{figure set title}\figsetgrpstart\figsetgrpnum{figurenumber.1}\figsetgrptitle{short image 1 title}\figsetplot{figure set file}\figsetgrpnote{image 1 caption}\figsetgrpendRepeat the block above for each figure in the set\figsetend
The second command, \figsetnum, is the figure sequence number. The \figsettitle is the title for the entire figure set. The next six commands, between \figsetgrpstart and \figsetgrpend, must be repeated for each image in the figure set sequence. The \figsetgrpnum increments by one each time, e.g. figurenumber.1, figurenumber.2, figurenumber.3, etc. \figsetgrptitle is a title used to uniquely identify the specific image. It should be relatively short but descriptive as there is not much space for this title (see figure below). \figsetplot is the call to the EPS or PDF file containing the image. If an image consists of multiple EPS or PDF files one \figsetplot is required for each file. Lastly, \figsetgrpnote is the figure caption for the specific image called by \figsetplot. This caption may be unique or identical to all the others in the figure set but it must be specified in this field.
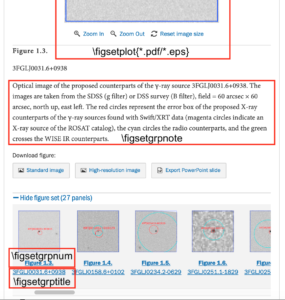
The figure shows where the repeated figure set commands are placed in the published article. This is provided to give the user some idea of how the raw LaTeX commands are rendered in the final product. Authors are encouraged to consult the Astronomy Image Explorer to view more examples of published figure sets.
The example figure or figures should be placed after the figure set mark up in the LaTeX file and created like a normal figure, e.g., \begin{figure} ….
Additional figure set information is available in the graphics guide.
We now support animations as regular figures in AAS Journal articles. This functionality utitlizes a streaming widget that works in all major browsers and on mobile platforms.
Authors must supply a static representation of the animation, e.g. a still image from the video, in EPS/PDF format marked up like a regular figure to serve as an reference for the reader. The caption of an animated figure should include text describing the animation and indicating that an animation is available in the HTML version of the final article. For instance, “This figure is available as an animation.” As with figure sets, authors should include enough information in the figure caption for readers of the final PDF article to determine what the animation illustrates.
Please also use the new interactive environment with all example animation figures.
\begin{figure}
\begin{interactive}{animation}{video file name}
figure call (e.g.\plotone, \includegraphics, etc.)
\end{interactive}
\caption{Descriptive caption of example figure and what the animation shows.}
\end{figure}
The last argument in interactive is the video file that the publisher will stream in the HTML article.
Additional animation information, including optimal codecs, is available in the graphics guide.
Interactive figures give the reader the ability to manipulate the information contained in an image which can add clarity or help further the author’s narrative. All interactive figures consist of two parts, the static figure file for the LATEX/PDF copy and a dynamic Javascript and HTML framework that provides interactive control. We have published rotatable 3D images, zoom and clickable vector plots, and “blink” style figures. Examples can be discovered in the Astronomy Image Explorer and searching the content type for interactive figures.
We have also partnered with the Astropy Project to provide an easy way to include interactive figures of time series (such as light curves, radial velocity curves, etc.) in articles that are created from Python and does not require any expertise in Javascript. A new astropy.timeseries module is now available in the astropy core package, and can be used to construct a time series object in Python. With this object, you can then make use of the aas-timeseries package to create your interactive figure. We recommend reading through the guides in the aas-timeseries documentation to find out how to create such figures. In particular, the section Preparing an interactive figure for submission to AAS Journals will show you how to create a .zip bundle containing all the necessary files for the interactive figure as well as static PDF versions of the figures that you can then include in your paper.
Since interactive figures are not actionable in LaTeX/PDF it is necessary to include a non-interactive regular figure to use as an example. The example figure should also indicate to the reader that the enhanced figure is interactive and can be accessed online. Authors should use the new interactive environment in all example interactive figures.
\begin{figure}
\begin{interactive}{type}{file}
figure call (e.g.\plotone, \includegraphics, etc.)
\end{interactive}
\caption{Description of the example figure and the interactive portion which includes how to use the interactive functionality.}
\end{figure}
The interactive environment should surround the example figure call and possess two arguments. The first is declaration of the enhanced graphic type while the second argument is the .tar.gz or .zip package containing all of the interactive elements, e.g html framework, javascript driver, and data file. Authors should use the type js for generic javascript interactive figure and lc for astropy generated light curve figures.
Additional animation information, including basic requirements and supported frameworks, is available in the graphics guide.
Authors who wish to have the most important objects in their manuscript linked to CDS/Simbad or NED may do so using the
\object{text}
macro, or its alias \objectname. The text contained in the required argument will be shown in the manuscript and will serve as a link anchor to the source resolved by CDS’s Sesame name resolver. In cases where an author wants to show a name not recognized by Sesame, the macros take an optional argument to supply a known name that will be used as the CDS identifier instead of the primary argument text, e.g.
\object[SDSS J000004.21+000122.4]{J0000+0001}
This allows the author more flexibility when constructing the object link. This example highlights the fact that such truncated names are often misleading or severely ambiguous and that the first usage of an object name in a text should provide the full, validated name before subsequently utilizing any truncations.
Note that links will only be activated if the name provided in the argument is recognized by a participating data center. CDS has a validator that will extract this mark up and display a summary of which names could be verified. Authors are strongly advised to use this tool prior to submission as it is the author’s responsibility to use a recognized identifier. Complete information on proper object nomenclature is provided in the NED Best Practices guide (doi:10.26132/NED7). Note that the CDS tool does some cleaning of math mode before validating the names therefore it is better to use math mode for hyphens, e.g. “$-$”, instead of double-hyphens, “–“.
LaTeX markup is available for linking to datasets created by the author and hosted externally from the Journals at generalist, e.g., Zenodo, institutional, or domain-specific repositories. The LaTeX tag is:
\dataset[text]{url}
Where url is the URL link to the data. The bracketed argument is optional. When present the given text is used as the displayed hyperlink otherwise [DATASET] is printed.
The \doi command has been modified so that “https:/doi.org/” is prepended to the argument and the resulting output is hyperlinked. This command can be used with \dataset. For example the LaTeX:
The data is available at MAST: \dataset[10.17909/T9XG63]{\doi{10.17909/T9XG63}.
produces text:
The data is available at MAST: 10.17909/T9XG63.
Another example LaTeX markup (for Zenodo) is:
The data is available on Zenodo under an open-source
Creative Commons Attribution license:
\dataset[doi:10.5281/zenodo.3938720]{https://doi.org/10.5281/zenodo.3938720}.
that produces:
The data is available on Zenodo under an open-source Creative Commons Attribution license: doi:10.5281/zenodo.3938720.
More information on how to use such repositories is available in our Data Guide, in our Repositories Tutorial on GitHub, and in the article, “Best Practices for Data Publication” (Chen et al. 2022, ApJS, doi:10.3847/1538-4365/ac6268) where the most recent version is hosted by NED (doi:10.26132/NED7).
When discussing atomic species, ionization levels can be indicated with the following command.
\ion{element}{level}
The ionization state is specified as the second argument and should be given as a numeral. For example, “Ca III” would be marked up as \ion{Ca}{3}.
For single, double, and triple chemical bonds, use the following macros.
\sbond\dbond\tbond
AASTeX contains commands that permit authors to specify alternate forms for fractions. LaTeX will set fractions in displayed math as built-up fractions; however, it is sometimes desirable to use case fractions in displayed equations. In such instances, one should use \case rather than \frac. Note, however, that authors using AASTeX should generally find it unnecessary to use any markup other than the standard LaTeX \frac.
| Built-up | \frac{1}{2} | [1/2] |
| Case | \case{1}{2} | \case12 |
| Shilled | 1/2 | 1/2 |
As mentioned earlier, the AASTeX package contains a collection of assorted macros for symbols and abbreviations specific to an astronomical context. These are commonly useful and also somewhat difficult for authors to produce themselves because fussy kerning is required. See the symbols pages provided with the package distribution. Most of these commands can be used in both running text and math. However, \lesssim and \gtrsim can only be used in math mode.
The IAU 2015 resolution B3 defines nominal solar and planetary values by establishing conversions between solar and planetary values and SI units. The rational and specifications are given in Prsa et al. 2016, AJ, 152, 41. The recommended nominal conversion constants for LaTeX have been incorporate into v6.3.1 to help authors follow the IAU resolution.
The general commands are:
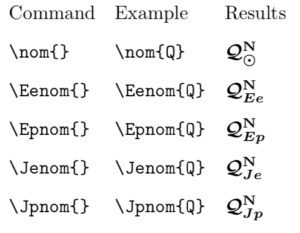
Where the subscripts Ee, Ep, Je, and Jp refer to the equatorial and polar radii of Earth and Jupiter, respectively. Other examples and predefined commands in AASTeX v6.3.1 include: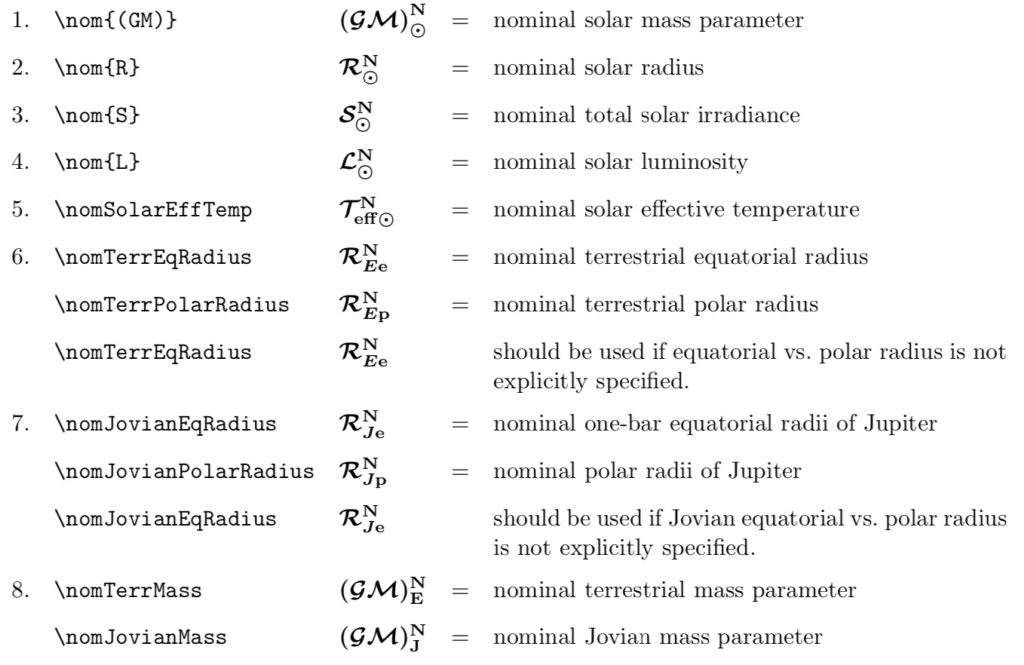
AASTeX now uses the hyperref package for typesetting hyperlinks. Please do not import hyperref as a package. The \href{href}{text} tag associates text in the manuscript with the specified resource (href) where href should be specified as a full URI, including the scheme: designator (http:, ftp:, etc.). The \url command supports the special case where an author wishes to express a URL in the text. With the hyperref package LaTeX can interpret any URL without requiring encoding of special characters.
Authors should use the \hypersetup command in the preamble to override the classfile defaults. For example,
\hypersetup{linkcolor=red,citecolor=green,filecolor=cyan,urlcolor=magenta}
resets the colors to the \hyperref defaults.
Several new commands have been introduced to make it easier to track revisions. To begin authors must include the trackchanges option when calling the style file, e.g.
\documentclass[trackchanges]{aastex631}
The new commands \edit1{<text>}, \edit2{<text>} and \edit3{<text>} have been introduced to make it easier for authors to highlight changes to the manuscript in response to editor and referee comments. The three commands will produce bold, bold+italic, and bold+underlined <text>, respectively. Authors that choose to use these commands to highlight changes should use the first command to highlight new text from the first revision, the second command from the second revision and the third command if a third revision is necessary. The goal is to make it obvious what has been changed and at what point during the peer review process. In AASTeX v6.3.1 the \turnoffeditone, \turnoffedittwo, and \turnoffeditthree commands are introduced to control which specific revision mark is repressed. The \turnoffedit command will repress all of the text mark with any \edit command.
The last command in the electronic manuscript file should be the
\end{document}
command, which must appear after all the material in the manuscript. This command directs the formatter to finish processing the manuscript.
The default style option is a single space and single column with a 10 point font style.
The twocolumn style produces a tightly typeset double column format similar to the onecolumn style. It is important to remember that text lines are considerably shorter when two columns are typeset side by side on a page. Long equations, wide tables and figures, and the like, may not typeset in this format without some adjustments. When using this style authors will need to size tables and figures accordingly or use the asterisk option to force these floats to span both columns, see 2.15.1. To invoke this style use
\documentclass[twocolumn]{aastex63}
The twocolumn style sets the article’s front matter-the title, author, abstract, and keyword material-on a separate page at full text width. The body of the article is set in a two-column page grid, the appendices in a one-column page grid, and the bibliography in a two-column page grid.
The full list of allowed options are:
| Option | Output |
|---|---|
| twocolumn | 10 point font in a single spaced, two column style. |
| preprint | Same as the default except with 12 point font. |
| preprint2 | Same as twocolumn except with 12 point font. |
| modern | a stylish, single column, 12 point font, article with wider left and right margins. This uses the Daniel Foreman-Mackey and David Hogg design |
| manuscript | 12 point font in a double spaced, single column style. |
| RNAAS | Use specificly for Research Note manuscripts. The normal typesetting for an abstract is suppressed. Note that a \section command is required in a Research Note in order to generate the title and author information in the compiled pdf file. Use \section{} to suppress the section header. Note that as of May 1st, 2020, this option should no longer be used as Research Notes require a short abstract. |
| astrosymb | Uses Astrosymb fonts and defines \astro commands |
| tighten | Produces tighter typesetting by reducing the baselinskip. Only works with twocolumn. |
| times | Use the ubiquitous Times font |
| linenumbers | Number each line in left margin. Authors are encouraged to use this option as it makes the reviewing process easier for everybody. |
| trackchanges | Produce tracking revision changes in manuscript |
| longauthor | Do not use the more compressed footnote style for the author/collaboration/affiliations. Instead print all affiliation information after each name. Creates a much longer author list and thus should only be used for manuscripts with few authors. |
| anonymous | Hide the author and affiliation information plus the acknowledgements. Note that the \acknowledgments command must appear before the acknowledgement text in order to be hidden. |
| twocolappendix | Make a two column appendix. Only useful under the default, modern, and manuscript formatting styles. |
All of these styles can be used in conjunction with each other, e.g.
\documentclass[twocolumn,linenumbers,longauthor,trackchanges]{aastex63}
The preceding explanation of the markup commands in the AASTeX package has merit for defining syntax, but many authors will prefer to examine the sample manuscripts that are included with the style files. The files of interest are described below.
A comprehensive example employing nearly all of the capabilities of the package (in terms of markup as well as formatting) is in sample631.tex. This file is annotated with comments that describe the purpose of most of the markup. sample631.tex includes multiple tables and figures. The sample file, along with other documentation, can be obtained in the full distribution download.
Using bibcodes containing ampersands, e.g. A&A articles, as a citation key in a table will cause problems. LaTeX will either interpret the ampersand as a column delimiter or if escaped with an ”\” LaTeX will not recognize the citation label. The solution is to create an alias for these types of citations before the table. Here is an example.
{\catcode`\&=11
\gdef\2016AandA...590A.123S{\cite{2016A&A...590A.123S}}}

\begin{deluxetable}{cc}
\tablecaption{Demo}
\tablehead{\colhead{Important Fact}& \colhead{Reference}}
\startdata
Massive & \2016AandA...590A.123S \\
Luminous & \cite{2015AJ....149...95S} \\
\enddata
\end{deluxetable}
When using a two column format (twocolumn, preprint2) it is sometime necessary to have text span both columns. This can happen with equations and very long urls. The widetext environment:
\begin{widetext}
...
\end{widetext}
will have all text between span both columns. In the typeset output the upper left column and lower right column around the spanned text will have a line border to help guide the eye. This environment has no effect in single column format (default, modern, manuscript, or preprint).
Alternatively, authors can force a manuscript to change to a single column format with a two column format style and vice versa with the \onecolumngrid and \twocolumngrid commands. LaTeX will make the column switch at the location of the command.
\documentclass[twocolumn]{aastex63}
\begin{document}
The following text will be in two column format per the "twocolumn" style call.
...
\onecolumngrid
Now LaTeX will render the following text in single column format.
...
\twocolumngrid
Now back to the original two column format.
...
\end{document}
Authors can control the space between data lines in tables by making a simple modification to the classfile. The line \def\arraystretch{1.0} is set to the default value of 1. To increase the space between data lines by 10% change the argument to 1.1. Likewise, to decrease the space between data lines by 10% to produce a tighter table use 0.9.
In general, authors are encouraged not to use external packages unless there is an absolute need for it. Due to their size and complexity, it is very likely that any external package will have some conflicts with AASTeX or its underlying ReVTeX package. As we are made aware of them we will try to come up with solution and document them here.
There is a known conflict between AASTeX’s deluxetables and the siunitx.sty style package. Both define \tablenum which leads to the conflict. A solution has been built into v6.3. First, allow siunitx to redefine \tablenum for its own purposes with this command just before siunitx is called.
\let\tablenum\relax
\usepackage{siunitx}
Second, if a table needs to be renumbered via the \tablenum command use the \savetablenum command instead so siunitx can use \tablenum.
\begin{deluxetable}{ccc}
\savetablenum{5}
\caption{Renumbering tables while using the sinuitx package}
\tablehead{\colhead{1} & \colhead{2} & \colhead{3}}
\startdata
A & B & C \\
\enddata
\end{deluxetable}
Both adjustbox.sty and AASTeX v6+ define the command splitbox. This command needs to be redefined in AASTeX in order to us the adjustbox package.
There are known compatibility issues between the amsmath and lineno packages when numbering around equations. Depending on how the equation is called the text above may not be numbered. While AASTeX v6.3.1 corrects the majority of the problems, issues may remain with more exotic equation environments. The first order solutions are to include line breaks around any equation environments and to use the \[ ... \] notation instead of $$ ... $$.
The Perl tool latexdiff, which can be found in CTAN or common TeXLive distributions, is a simple tool too easily satisfy the criteria that revised manuscript put added text in bold so the science editor and reviewer can readily identify what has changed. Rather than insert command to highlight changes, latexdiff will compare the output from a new version of a manuscript with an older version and produce a new latex file with the updated text automatically highlighted.
latexdiff is run from the command line. This call will produce output that has all new text highlighted in bold.
latexdiff -t BOLD old.tex new.tex > diff.tex
where “old.tex” is the original latex file and “new.tex” is the revised copy. The output is sent to the “diff.tex” file. Compile this “diff.tex” file to produce the PDF copy with the bold text. You can upload the “new.tex” version to our peer review system along with the “diff.pdf” copy at revision. Note that if you do not use the “-t BOLD” argument, the default will show the added text as wavy-underlined and blue while removed text will be struck out and red. Please see the online documentation for more details.
AASTeX was first designed and written by Chris Biemesderfer and Robert Hanisch at the Space Telescope Science Institute in 1988. Substantial revisions were made by Lee Brotzman and Pierre Landau when the package was updated to v4.0. AASTeX was rewritten as a LaTeX2e class by Arthur Ogawa for the v5.0 release. It was updated to v5.2 by SR Nova Private Ltd. Amy Hendrickson (TeXnology Inc.) wrote the v6.0 – v6.3.1 releases which were primarily based on the emulateapj classfile created by Maxim Markevitch and Alexey Vikhlinin. Daniel Foreman-Mackey and David Hogg created the look behind the new modern style design. Considerable help via bug reports and hacks have come from numerous people including Patricio Cubillos, Alex Drlica-Wagner, Sean Lake, Michele Bannister, Peter Williams, and Jonathan Gagne. Over the years the documentation has benefited from revisions by Jeannette Barnes, Sara Zimmerman, Greg Schwarz, Gus Meunch, Amy Henderickson, and Butler Burton. A complte revision history is provided.
Authors are encouraged to contribute bug reports via the AASTeX page on github or emailing the AASTeX help desk at aastex-help@aas.org.
The American Astronomical Society (AAS) have partnered with IOP Publishing to create an exciting new collection of astronomy and astrophysics ebooks to further the AAS mission: "to enhance and share humanity's scientific understanding of the universe."

In keeping with our mission, the entire AAS journals portfolio was made freely accessible as of 1 January 2022. Read more.

2.6 Author Comments
Authors may make parenthetical notes or comments with the \authorcomment1 command.
This command produces the included text in bold in parenthesis. Similar italicized and plain parenthetical text can be produced with the \authorcomment2 and \authorcomment3 commands. In all commands the text “Author note:” will be prepended to the text. The text in any of these commands appears in the manuscript unless the \turnoffedit command is included in the preamble at which point it disappears altogether. While writing an article, authors can use these commands to mark up sections they are not sure should appear in the final version or provide internal comments to the other co-authors. The three colors provide the ability to identify different co-author comments or document version control.